Configure Dynamic Data Masking using T-SQL
In last few blogs about Dynamic Data Masking we got the basic understanding of the topic & how to configure Dynamic Data Masking using Azure SQL Database portal. In this blog we’ll configure Dynamic Data Masking using T-SQL Scripts on Azure SQL Database.
Before we begin anything you must get some basic idea about the different available Data Masking functions\rules which can be applied to your columns containing sensitive data. There are mainly four different type of masking functions available out of the box, these are:
- Default also known as Full Masking
- Random
- Custom String
Let’s get some more idea about each one of them.
Default or Full Masking: As the name suggests, this masking completely cover the data with ‘X’ values. It replaces the alphanumeric\string type values with ‘XXXX’ which makes it very difficult to guess. If the underlying column is using any numeric data type then the value gets replaced with 0 (zero) and for all date time data type columns it uses the starting date which is “01.01.1900 00:00:00.0000000”. We SQL DBAs are very familiar with this date, right? J
Email: This is simple to understand, this Masking method exposes the first letter of an email address and the constant suffix “.com”, in the form of an email address. Like: aXXX@XXXX.com.
Random: This function can be applied on numeric data type columns, this replaces the actual value with a random numeric value within the range provided while configuring this masking.
Custom String: Last but not the least is Custom String, this lets you choose your own method to mask the data. You get so many options to choose from like you can specify how many initial and last characters to show to the user and in-between the text can be replaced by any text or a special character. Note: If the original value is too short to complete the entire mask, part of the prefix or suffix will not be exposed.
Configure Dynamic Data Masking using T-SQL
Once you understand the different available data masking functions, it becomes very easy to Configure Dynamic Data Masking using T-SQL.
Let’s take an example that we have to create a new table for our Application and we want to configure Dynamic Data Masking, for the purpose of doing this we must add the masking function parameter while defining the table itself. However, it is quite possible to change the column later by using Alter Table command.
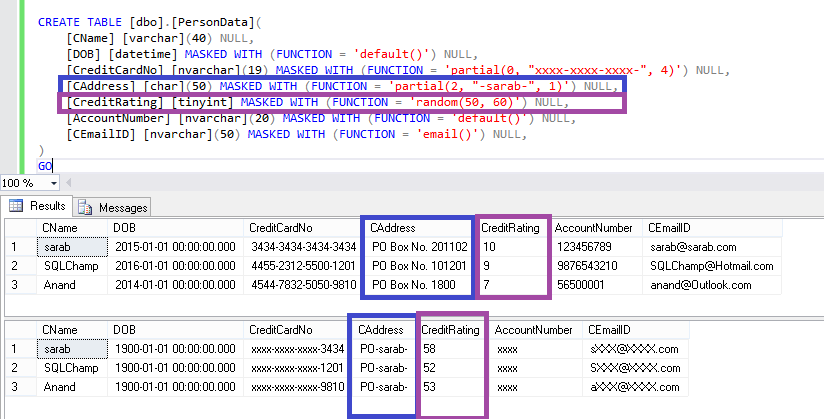
This is the Script I used to create the table with my own specific masking rules to mask the sensitive data:
CREATE TABLE [dbo].[PersonData](
[CName] [varchar](40) NULL,
[DOB] [datetime] MASKED WITH (FUNCTION = ‘default()’) NULL,
[CreditCardNo] [nvarchar](19) MASKED WITH (FUNCTION = ‘partial(0, “xxxx-xxxx-xxxx-“, 4)’) NULL,
[CAddress] [char](50) MASKED WITH (FUNCTION = ‘partial(2, “-sarab-“, 1)’) NULL,
[CreditRating] [tinyint] MASKED WITH (FUNCTION = ‘random(50, 60)’) NULL,
[AccountNumber] [nvarchar](20) MASKED WITH (FUNCTION = ‘default()’) NULL,
[CEmailID] [nvarchar](50) MASKED WITH (FUNCTION = ’email()’) NULL )
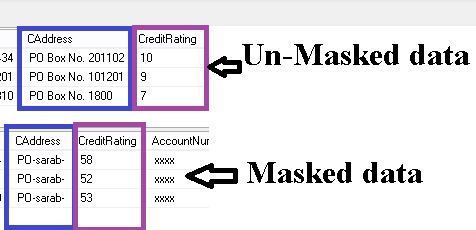
Pay close attention to the table creation statement, here I’ve changed the masking rules a bit for two columns. CAddress and CreditRating. Here are the rules:

You can see I choose to show initial 2 characters of CAddress column and given a padding value as “–sarab-” which will replace all rest of the data except last 1 character. For CreditRating column I am using random string function and given a range of 50 to 60.
Let’s see how the result set looks like:
This is how the complete result set looks like:
Yes, we were able to successfully Configure Dynamic Data Masking using T-SQL.
Hope you got answer to your questions! Happy Learning!
feel free to leave a comment. 🙂
Thanks,
Sarabpreet Singh Anand
Subscribe now to get latest Tips\blog posts in your Inbox
Follow @SQLChamp
Follow @Sarab_SQLGeek